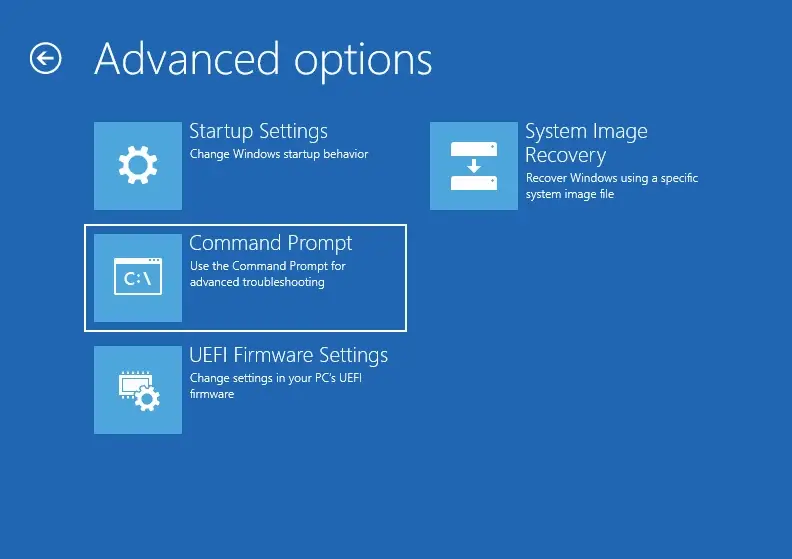
How to expand Windows partition with Recovery in the way
Microsoft Windows allows for the ability to extend a partition into the available unallocated space on a disk using Disk Management. This is especially useful in Hyper-V environments. Where one may start a partition out at a smaller size with the intention of expanding it at a later date when the need for additional storage becomes necessary. Those that administer dedicated data partitions should find that expanding into the unallocated storage space comes without issue. However, when there's a need to expand the partition where Windows is installed, one may find that the Windows Recovery partition is located between this Windows partition and the unallocated storage space. Preventing the process of extending the Windows partition from proceeding with the Recovery partition being in the way.
This trouble usually leads to the use of third party tools as an alternative to rearrange and extend the partitions on the disk. But these tools can come with the risk of damaging the partition structure on the drive. Preventing Windows from booting and resulting in a reinstall of the operating system or a restore from backup. Some tools are free and don't have any support options or warranty. Others can come at a high price point or subscription cost. Some technicians will opt to delete the Recovery partition altogether. Which can safely be done, but results in the loss of the recovery tools that are useful in cases when Windows is unable to boot.
This guide will go over the steps of using all builtin tools available within Windows to move the recovery partition to the end of the disk. This will consist of backing up the Recovery partition so that it can then be restored to a new partition after we've completed the extension of the Windows partition in its absence. Preventing the loss of the Recovery partition and its useful tools when it comes to repairing Windows.
Step 1: Identify and assign a drive letter to the Recovery partition using Diskpart
Before we can make a backup of the Recovery partition, a drive letter must be assigned to it in Windows. Diskpart will be used in this case to identify the Recovery partition and assign the drive letter. First we must initialize the Diskpart utility by opening a command prompt running as Administrator and submitting the following command.
diskpart
Once this command has been sent in the command prompt, the prompt will then change from showing the selected directory to displaying "Diskpart>" preceding the next command to be entered. This indicates that we're now accessing the Diskpart utility within Windows. The next command to be entered will list the disks available in Windows. This is where we'll select the disk that's applicable to the disk which contains the Windows and Recovery partitions and is also the disk that contains the unallocated disk space that we'll want the Windows partition to extend into.
DISKPART> list disk
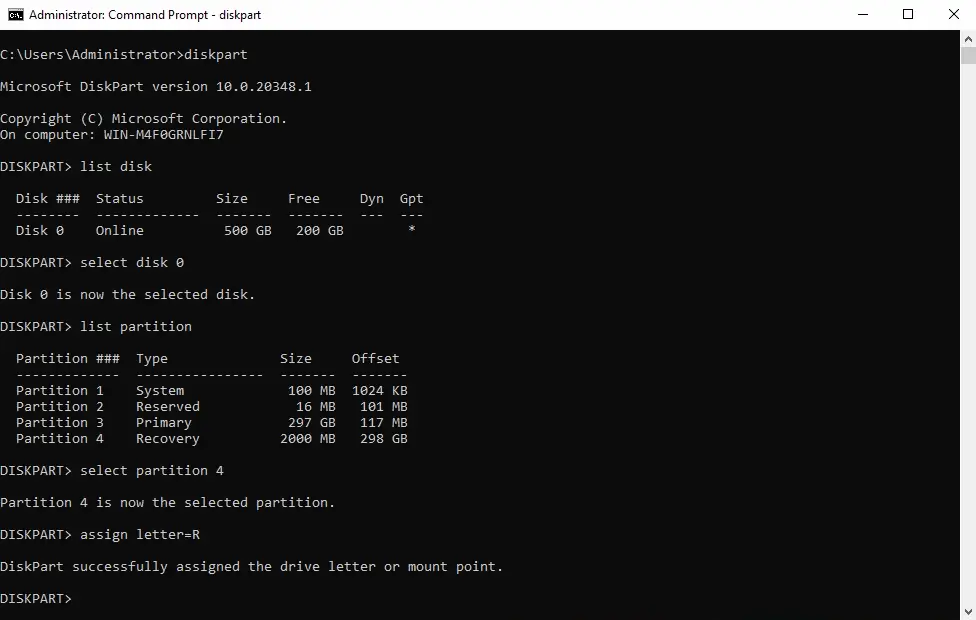
Figure 1 below shows Disk 0 as being the correct disk in our example. This step will be easy if the computer has only one disk to choose from. If more than one disk is listed on a computer, the correct disk can be identified by the Size and Free space that's listed. Which should amount to the total disk size and the amount of unallocated storage space respectively. Select the appropriate disk by submitting the command below. Changing the disk number in the example to the number that corresponds to the correct disk on your computer.
DISKPART> select disk 0
After selecting the disk, the partition number associated with the Recovery partition will then need to be identified. This is done by issuing the following command within the Diskpart utility and looking for the word "Recovery" listed as the partition type.
DISKPART> list partition
Figure 1 shows that partition number 4 is associated to the Recovery partition in our example. Similar to how we had selected the disk in the previous steps, the applicable partition will now need to be selected and assigned a drive letter that we'll use to access it in the steps to follow. This is done by issuing the following two commands within the Diskpart utility. The first command will need to be updated with the partition number that corresponds with the number that applies to the Recovery partition on your computer. The drive letter selection can be the same as what's shown below. As long as it's not already in use by another volume on your computer.
DISKPART> select partition 4

DISKPART> assign letter=R
Step 2: Create a backup of the current Recovery partition
The drive letter assigned to the Recovery partition in the previous steps will now be used to create a backup image of this partition. This is an important step to ensure that we'll be able to restore the Recovery partition back to the disk after extending the Windows partition in later steps. It's best to create a directory called Backup on your C: drive or another drive of your choosing other than the drive that's associated to the Recovery partition itself. We'll use this directory to temporarily store the backup image of the Recovery partition.
The partition where this backup is going to be saved to is recommended to have at least 1 GB of free space available. If the C: drive doesn't have the sufficient free space available for this task, a USB flash drive can be used instead. Those working with Hyper-V environments also have the option of creating a temporary VHDX file to hold the backup of the Recovery partition. Which can then be removed at the completion of this guide.
Use the command below in an elevated command prompt running as Administrator to create a backup image of the Recovery partition. The example below will create an image file called recovery.wim and save it to the Backup directory on the C: drive of the computer. Be sure to update the drive letter assigned to the Recovery partition in the command below if you've chosen to use a different drive letter assignment in the previous steps. As well as the destination drive if you're saving the image file somewhere other than the C: partition.
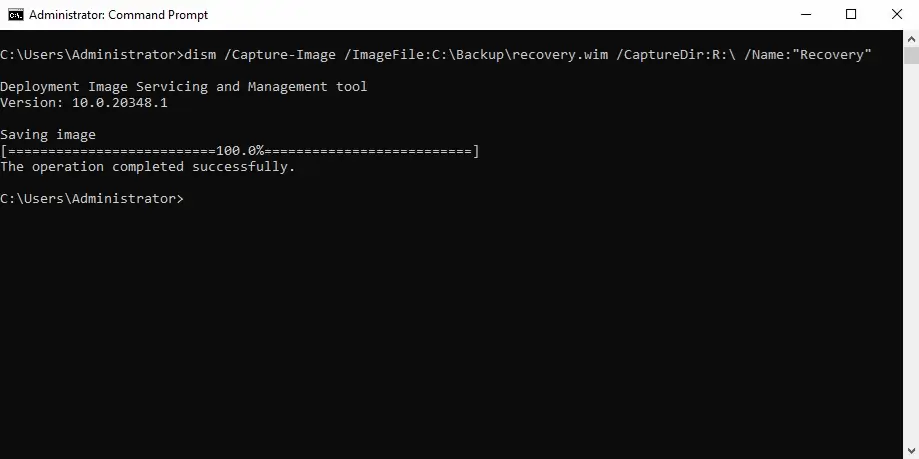
dism /Capture-Image /ImageFile:C:\Backup\recovery.wim /CaptureDir:R:\ /Name:"Recovery"
The expected output in Figure 2 below shows that the image file is being saved to 100% and states that the operation has completed successfully. Make sure the same output is received on your computer and check that the recovery.wim file exists in the Backup directory where it was saved.
Step 3: Disconnect and delete the Recovery partition from Windows
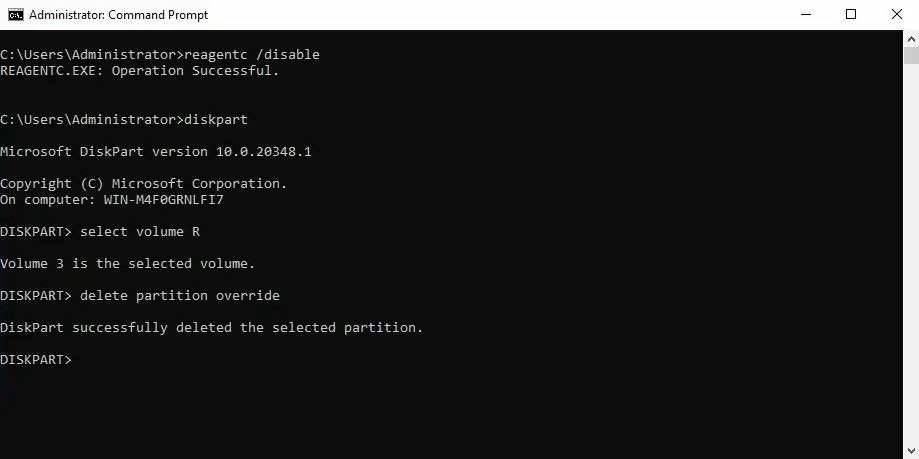
After confirming that a backup image of the existing Recovery partition has been successfully created, the Recovery partition can now be safely disconnected and temporarily deleted from Windows. The command below uses the Windows Recovery Agent to disable the Windows Recovery Environment to prepare the Recovery partition for deletion. Please enter the command below in an elevated command prompt running as Administrator.
reagentc /disable
Deleting the Recovery partition from Windows requires that we use the Diskpart utility that was used in step 1. Windows will not allow us to use the Disk Management utility to successfully delete the Recovery partition. Instead, Diskpart will need to be used to select the volume by its drive letter and an override option will be used within the utility to delete the Recovery partition. Update the commands in the example below to reflect any changes you've made to the drive letter that was assigned to the Recovery partition in the previous steps.
DISKPART> select volume R

DISKPART> delete partition override
Step 4: Extend the Windows partition and create a new partition for Recovery
With the recovery partition now successfully removed, the unallocated disk space should be displayed alongside the Windows partition in Disk Management. Allowing the Windows partition to be extended into the unallocated space. Extending the Windows partition will need to be done with consideration towards allowing enough unallocated storage space to remain on the disk for the Recovery partition to be restored to. It's recommended that this new partition, that'll later become the Recovery partition, be no less than 1 GB or 1024 MB in size. You may follow the steps below to extend the Windows partition and prepare a new partition for the Recovery image to be restored to.
- Right click the Start button and select Disk Management from the context menu.
- Right click the Windows partition as it appears in the bottom section of Disk Management and click Extend volume from the context menu that appears.
- Subtract at least 1 GB (1024 MB) from the maximum available disk space and enter this number into the Select the amount of space in MB field.
- Disk Management should now show unallocated space of at least 1 GB.
- Right click the unallocated space and select New simple volume from the context menu.
- Proceed Next through the first two steps and assign the letter R (if available) to the new partition.
- Change the Volume Label at the Format Partition window to "Recovery." Leave the rest of the options at their defaults.
- Click Next and then Finish to finalize the creation of the new partition that'll later become the Recovery partition.
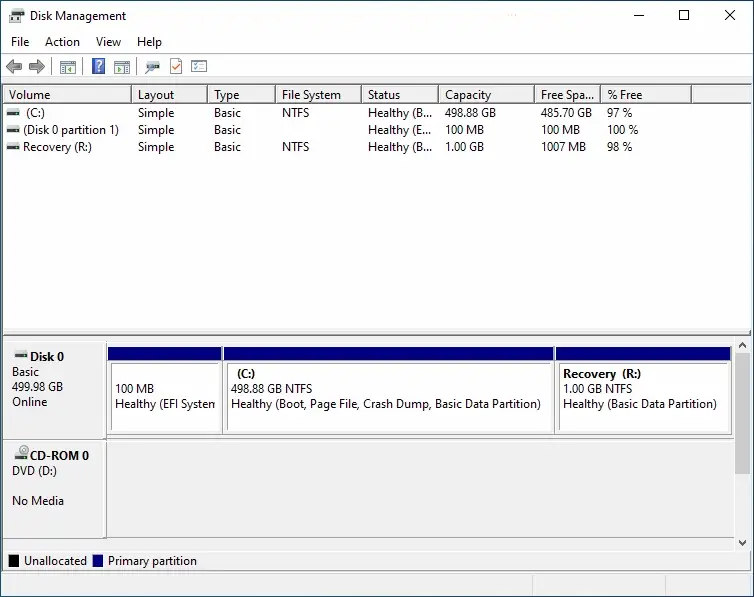
Figure 4 below shows the end result of the above procedure. Here it's shown that the Windows partition has already been extended and that a new 1 GB partition exists at the end of the disk with a volume label of Recovery. This partition will currently show as blank until the image of the Recovery partition has been restored.
Step 5: Restore the Recovery partition & hide it from Windows
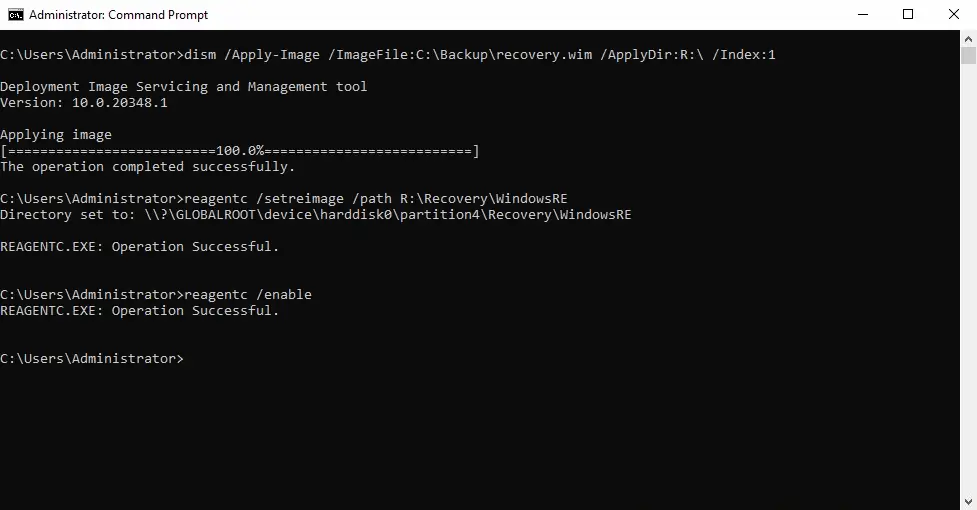
Restoring the Recovery partition involves the use of two separate sets of commands that are outlined below. The first command will make use of the image file created from the Recovery partition in step 2 and restore it to the 1 GB partition that was created for it in step 4. The last two commands in the example below will re-register the Recovery image that'll be used by Windows and enable it for use. Be sure to update these commands with any necessary changes that were made in the previous steps. Whether this was the use of a different drive letter than the letter R or a different location to where the image file of the Recovery partition was saved. These entries are shown highlighted in the example below.
dism /Apply-Image /ImageFile:C:\Backup\recovery.wim /ApplyDir:R:\ /Index:1

reagentc /setreimage /path R:\Recovery\WindowsRE

reagentc /enable
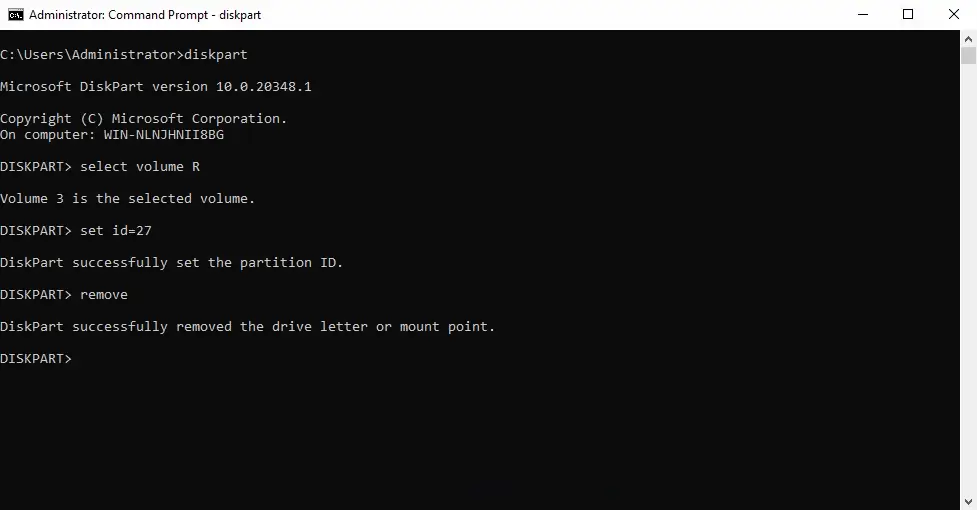
The final commands in this step will have us return to the Diskpart utility to hide the recovery partition while we're in Windows. This will bring us back to the original configuration where the Recovery partition doesn't appear in the Windows File Explorer. Before this can be done, the BIOS mode on the computer must be identified so that the correct set of commands can be entered. The steps below will outline how to identify the BIOS mode on the computer.
- Press the Windows Logo key and the letter R simultaneously on the keyboard.
- Type msinfo32 in the Run Command window that appears and click OK.
- Look for an entry for BIOS Mode within the System Summary and take note of whether it shows as UEFI or Legacy.
The two sets of commands below are for the two different BIOS modes that can be presented. It's only necessary to enter one set of these commands depending on whether your computer has shown UEFI or Legacy as the entry for BIOS mode in the System Information window. Using only the set of commands that corresponds with your BIOS mode. Be sure to update the commands to reflect any changes to the drive letter assignment of the Recovery partition that has been made in previous steps.
UEFI:
DISKPART> select volume R

DISKPART> set id="de94bba4-06d1-4d40-a16a-bfd50179d6ac"

DISKPART> gpt attributes=0x8000000000000001

DISKPART> remove
Legacy:
DISKPART> select volume R

DISKPART> set id=27

DISKPART> remove

The final stage involves removing the mount point for the Recovery partition from the Windows registry. It's especially important to update the drive letter in the command below if a different drive letter was used other than the letter R. Using the following command incorrectly could cause trouble with Windows connecting to other volumes on the computer.
REG DELETE HKLM\SYSTEM\MountedDevices /v \DosDevices\R: /f
An optional step would be to now boot to the Windows Recovery Environment to test if the recovery options for Windows are available. These will be located in the Troubleshooting section when booting to the Windows Recovery Environment and should show tools such as Command Prompt and System Image Recovery as displayed in figure 8 below.
