Use Command Prompt to restore Windows Registry
The Windows Registry is the heart and soul of any Windows computer. When something goes terribly wrong in the registry, it can cause Windows to no longer boot or have a wide variety of odd behaviors that could render the computer unusable. Most experienced users will turn to the System Restore utility in an attempt to resolve such issues, but often times this utility fails to successfully restore the system to the desired point in time. The RegBack folder is then looked to as the alternative location to where one can find backups of these registry files. Only to discover that Microsoft has now disabled these backups in Windows by default. Leaving you thinking that there's not a backup of the Windows Registry that you can restore from.
The folder C:\Windows\System32\Config\ contains the location to where the active registry files are located on a Windows computer. The supposed backup located at C:\Windows\System32\Config\RegBack\ will still exist on the system, but is often empty or contains unusable files. All with a size of zero bytes. There are five system registry hives in this directory that make up critical portions of the Windows Registry. These five files are shown in the list below.
- DEFAULT
- SAM
- SECURITY
- SOFTWARE
- SYSTEM
In addition to the above five files, there's also the NTUSER.DAT and USRCLASS.DAT files that are specific to each user. In this guide, we'll only be working with the five registry hive files that are listed above. As these are the files that are more critical to the system. This guide will show you how to use the Command Prompt from within the Windows Recovery Environment to replace these files with copies obtained from a system restore point.
Step 1: Launch Command Prompt & identify the Windows partition
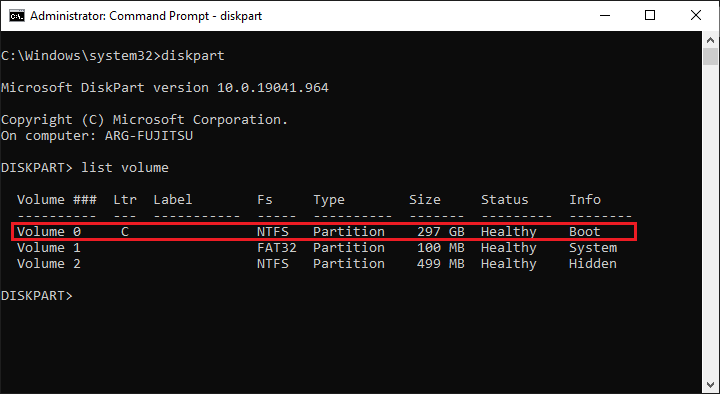
Windows will not allow the registry files to be replaced while the operating system is running. This will require that we launch the Command Prompt utility using the Windows Recovery Environment. After launching the Command Prompt from within this environment, the Windows partition that we'll be restoring the registry hive files on will need to be identified. This is the partition that contains the active Windows operating system that boots up when the computer is started normally. Submit the following commands in the Command Prompt window to access the Diskpart utility, list the volumes, and exit the Diskpart utility.
diskpart

list volume

exit
When Windows is running as normal, it's common for it to be assigned as the C: partition. This may or may not match the drive letter assignment it receives in the Windows Recovery Environment. You should be able to identify your Windows partition by confirming that the size shown in the command prompt output matches to what would be the total capacity of your C: drive when booting Windows normally. Take note of this drive letter as we'll be utilizing it in the steps to follow.

Step 2: Backup the current registry files
As was mentioned previously, the Windows Registry is the heart and soul of a Windows computer. Anytime a change is made to the critical components of the operating system, it's always best to make sure there's a pathway to go back to the point before any of these changes were made. Even if it's thought that the files that are being replaced will never be needed.
To perform a backup of the current registry files, a directory will be created on the root of the Windows partition named RegOriginal. This is where we'll store the original registry files before we remove and replace them with the ones from the restore point. Submit the following commands using the Command Prompt to create this directory and make copies of the five registry files to the newly created RegOriginal directory. Be sure to replace the drive letter in the commands below with the drive letter that you've obtained in step one.
mkdir C:\RegOriginal

xcopy C:\Windows\System32\Config\DEFAULT C:\RegOriginal\

xcopy C:\Windows\System32\Config\SAM C:\RegOriginal\

xcopy C:\Windows\System32\Config\SECURITY C:\RegOriginal\

xcopy C:\Windows\System32\Config\SOFTWARE C:\RegOriginal\

xcopy C:\Windows\System32\Config\SYSTEM C:\RegOriginal\
It's important to make sure that you see the output, "1 File(s) copied" after each of the five xcopy commands shown above. If you do not see this output or if you've instead received an error, do not proceed to the next steps until this issue is resolved. As you'll risk deleting or overwriting the original registry files in Windows without having a backup.
Once the five registry files have been successfully copied over to the RegOriginal directory, you may issue the following commands to remove the active registry files from Windows and prepare them for replacement. If anything goes wrong in the steps to follow, you can always copy the original registry files back to Windows from the RegOriginal directory.
del C:\Windows\System32\Config\DEFAULT

del C:\Windows\System32\Config\SAM

del C:\Windows\System32\Config\SECURITY

del C:\Windows\System32\Config\SOFTWARE

del C:\Windows\System32\Config\SYSTEM
Step 3: Make a symbolic link to the Shadow Copy Volume
In order to extract the registry files from the restore point, we'll need to identify and mount the shadow copy volume where Windows has these files stored. This will be done in two stages. The first is to change the current directory in the Command Prompt to the System32 directory where the vssadmin.exe executable can be accessed. The commands in the example below assume that your Windows partition in the Windows Recovery Environment is labeled as the C: partition. Remember to change this drive letter to the one you've obtained in the previous steps. Once the correct directory has been set, we'll then use the followup vssadmin command to display the list of shadow copy sets.
C:

cd C:\Windows\System32

vssadmin.exe list shadows
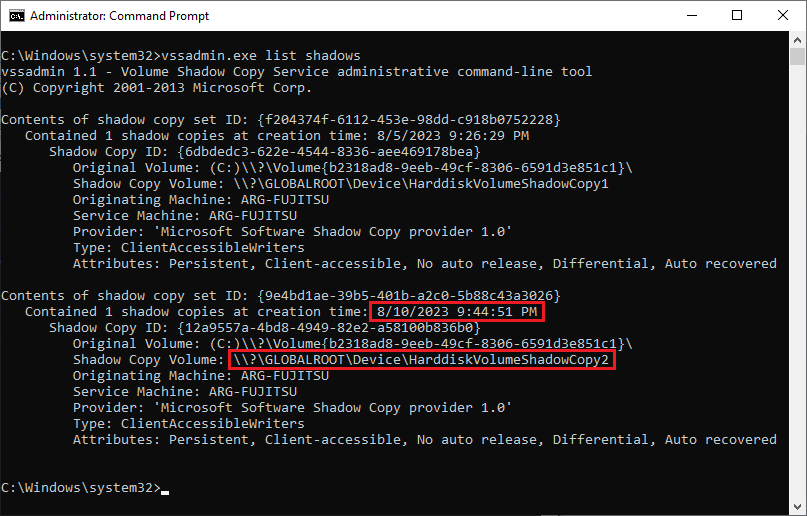
After submitting the vssadmin command, you should see output similar to what's shown in figure 2 below. Determine which shadow copy set you'd like to use based on the date that shows when it was created. You'll want to select the most recent shadow copy set from a date and time when your computer was working properly. It's recommended that you don't use a shadow copy set that's older than you need to. Take note of the corresponding entry for the Shadow Copy Volume that's displayed for the set that you've selected to use.

A symbolic link will now be made to the Shadow Copy Volume that was taken note of previously. This will be accomplished by submitting the following command to the Command Prompt window. The example below uses the highlighted output from figure 2 above in the command input. This will need to be changed to the correct entry for the Volume Shadow Copy obtained from your output of the vssadmin command that was issued previously.
mklink /d C:\ShadowCopy \\?\GLOBALROOT\Device\HarddiskVolumeShadowCopy2
If the command is successful, you should receive a response stating that the symbolic link has been created. Please note that you won't be able to change the current directory to this link to browse or list the directories or files.
Step 4: Restore the registry files back to Windows
Now that all of the prerequisites are in place, the registry files from the restore point that was selected can now be copied back to the C:\Windows\System32\Config directory where the active registry hive files are stored. This is done by submitting the commands shown below to copy the five registry files back to the appropriate location. Using the symbolic link to the Volume Shadow Copy that was created in the previous step. Remember to replace the drive letter in the commands below to the drive letter that corresponds with your Windows partition.
xcopy C:\ShadowCopy\Windows\System32\Config\DEFAULT C:\Windows\System32\Config\

xcopy C:\ShadowCopy\Windows\System32\Config\SAM C:\Windows\System32\Config\

xcopy C:\ShadowCopy\Windows\System32\Config\SECURITY C:\Windows\System32\Config\

xcopy C:\ShadowCopy\Windows\System32\Config\SOFTWARE C:\Windows\System32\Config\

xcopy C:\ShadowCopy\Windows\System32\Config\SYSTEM C:\Windows\System32\Config\
Confirm that you've received the output, "1 File(s) copied" after submitting each of the five commands to ensure that the files have been successfully copied. Once this process is complete, reboot the computer back into Windows normally. Where the restored registry files should now be active.