Error 0x8007001F when upgrading Windows 7/8 to Windows 10
Microsoft is still offering upgrades from Windows 7 and Windows 8 or 8.1 to Windows 10. Allowing use of the existing operating system licenses for Windows 7 and 8 for activation. Those who wish to upgrade and have downloaded the latest version of the Windows 10 Media Creation Tool will likely run into an error during the upgrade process that states the following error message:
0x8007001F - 0x20006
The installation failed in the SAFE_OS phase with an error during REPLICATE_OC operation.
This may lead one to believe that an upgrade from Windows 7 or 8 to Windows 10 is no longer possible and that a clean install of Windows 10 is necessary in order to use it on the computer. This requires a backup of the data and a reinstall of all of the programs upon completion. This guide will provide you with the solution on how to fix this error that prevents Windows 7 and 8 from being able to successfully upgrade to Windows 10. So that the tedious tasks of reinstalling software and performing restores of data can be avoided.
Solution 1: Use prior build 1909 of Windows 10 to upgrade first
If we look at the error that's displayed in the message, the SAFE_OS phase is initiated to install all of the required updates prior to the upgrade procedure. Knowing this may lead one to investigate a potential trouble with the Windows Update components on the current Windows 7 or 8 installation. However, if we consider that what is required in order to upgrade to Windows 10 has changed between prior builds and the latest build itself, it makes sense that the latest build may no longer support an upgrade directly from the older Windows 7/8 operating system. In this case, we must first upgrade to a prior build of Windows 10 from Windows 7/8 and then take Windows 10 up to the latest build from there.
GaulTech recommends an upgrade to Windows 10 build version 1909 by completing the steps in the order below:
- Download and extract a Windows 10 build 1909 ISO file to a folder on the Windows 7/8 C: partition.
- Run the setup.exe file located in the directory where you've extracted the ISO file contents.
- Follow the on screen steps to complete the upgrade from Windows 7/8 to Windows 10 build 1909.
- Download the Windows 10 Media Creation Tool from the Microsoft website and run it on the upgraded computer.
- Follow the on screen instructions to "Upgrade this PC" to bring Windows 10 build 1909 to the latest build of Windows 10.
GaulTech unfortunately doesn't offer the ISO file for direct download, but the file itself can be found at a number of other sources by performing a search on Google for "Windows 10 1909 ISO." Make sure that you download the ISO from a trusted source and verify that the file is of a legitimate size. It should be several gigabytes at least.
For extracting the ISO file, 7-Zip is the recommended software for Windows 7. Windows 8 should be able to mount an ISO file directly via Windows Explorer. Which can then be used to extract the contents to another folder.
Solution 2: Disable all third party services and/or temporarily uninstall antivirus
In cases where performing the steps outlined in solution 1 hasn't resolved the issue or results in a different error during the upgrade procedure, another likely cause of trouble could be the interference from third party security software that's installed on the computer or other services that are running in the background within Windows. It may be worth it to temporarily uninstall (not disable) your antivirus or security software from the computer until the upgrade procedures are complete. It's also possible that the software version of the security software that's currently installed may not be compatible with Windows 10. Preventing the upgrade from successfully taking place. Temporarily removing the security software and downloading the latest version for install after the upgrade has completed will ensure that the security software is of a compatible version.
Before removing the security software from your computer, ensure that you have everything you need to reinstall it. This includes any serial numbers or license keys for the software or your login credentials for the security software manufacturer's web site. Then perform the steps below to uninstall the security software.
- Press the Windows logo key and the letter R simultaneously on the keyboard. This will open the Run command window.
- Type "control" in the input field and click OK.
- Select "Large icons" in the "View by" drop down towards the top right and open "Programs and Features."
- Locate the security software in the list by its name and then right click on it. Select the option to "Uninstall."
If you don't wish to remove the security software from your computer or if you've already completed that step and are still not able to successfully upgrade to Windows 10, you can try the option to disable all third party items and services from your computer. This option doesn't remove software from your computer. It only disables the items from running automatically in Windows. Which can then be re-enabled once the upgrade to Windows 10 has successfully completed.
Disabling these items is done using the Microsoft Task Manager and System Configuration utility depending on whether your operating system is Windows 7 or Windows 8. Please follow the steps below for your applicable Windows operating system.
Windows 7
- Press the Windows logo key and the letter R simultaneously on the keyboard. This will open the Run command window.
- Type "msconfig" in the input field and click OK.
- On the Startup tab, deselect all items in the list.
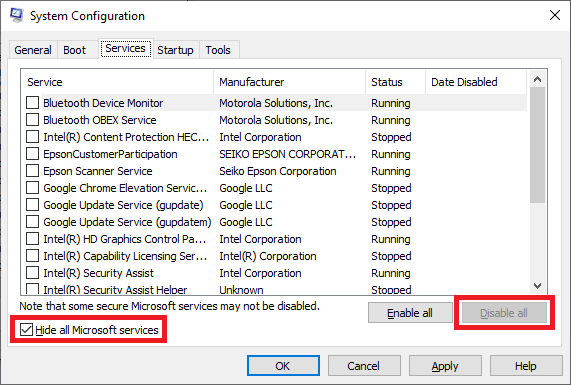
- On the Services tab, check the box next to, "Hide all Microsoft services" and then click the button that says "Disable all."
- Click on Apply and OK to save the settings. Then restart the computer and try upgrading to Windows 10 using the build recommended in solution 1.
Windows 8
- Press the Windows logo key and the letter R simultaneously on the keyboard. This will open the Run command window.
- Type "msconfig" in the input field and click OK.
- On the Services tab, check the box next to, "Hide all Microsoft services" and then click the button that says "Disable all."
- Click on Apply and OK to save the settings and exit the System Configuration utility.
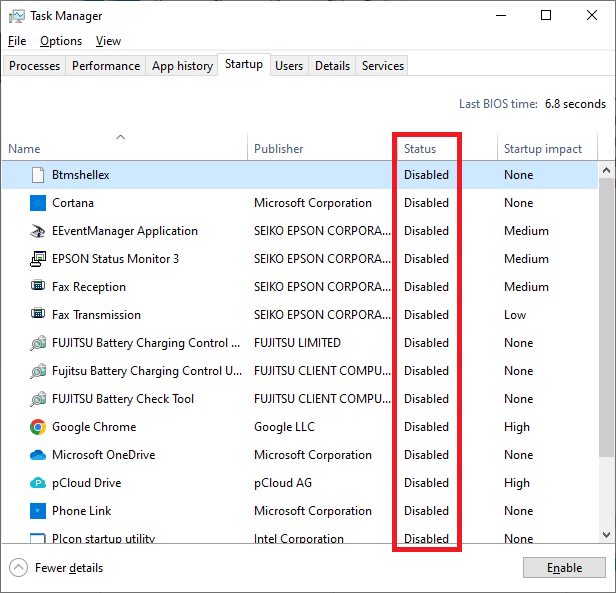
- Press CTRL+SHIFT+ESC on your keyboard to open Task Manager.
- On the Startup tab, right click each item in the list and select the option to "Disable" the item. Do this for all items until all are showing a status of "Disabled."
- Exit Task Manager and restart the computer. Then try upgrading to Windows 10 using the build recommended in solution 1.
Once Windows 10 has been successfully installed, return to the System Configuration utility and Task Manager to re-enable the startup items and services that were disabled previously. This is accomplished by reselecting the checkboxes to enable the services and right clicking the startup items to select the option to "Enable" them.

