Secure printer & folder sharing in Windows workgroup
Network security is always a top priority for any admin. Although a domain environment will offer the best level of security when it comes to local area networks, purchasing and setting up a Windows server isn't always in the budget for small offices. One may also just be looking to securely setup a shared folder or printer on their home network. So that they may share files and printers with other family members.
A basic understanding of the secure options that are available in Windows to accomplish folder and printer sharing in a workgroup network are essential. An inexperienced individual may select options to disable password protected sharing for an ease of use, but this isn't secure and can open up your shares to unauthorized use if someone were to gain access to the local network. A hacker can scan for devices on your network and browse to these shared resources if they're not secured. Granting them access to read, modify, and delete files or print malicious items to shared printers.
This guide will show you the step by step configuration for a shared folder or printer in a Windows workgroup and how to keep access to these items secure. Only those that you wish to have access to these resources will be able to make use of them. This will be accomplished by creating a local user account that's separate from the user account used on each workstation or computer. This new user will solely be used to authenticate to shared resources and will be hidden from view via a setting in the Windows registry. So that this account will not appear as an available user on the Windows login screen.
Step 1: Check firewall & advanced sharing settings
Before configuration of the shared resources can begin, we need to first verify that the Windows Firewall profile is set to a private network. If the firewall profile is set to a guest or public network, the default options in either of those firewall profiles may interfere with the connections being made to and from the other computers on the network. This firewall profile will need to be set for all of computers on the network that'll be sharing resources or accessing shared resources with other computers. Please follow the steps below on each computer to check the firewall profile setting.
- Left click the start button and select the cogwheel to open Windows Settings.
- Select the option for Network & Internet and then Ethernet in the left column.
- Click Ethernet in the center column and make sure the option under "Network profile" is set to private.
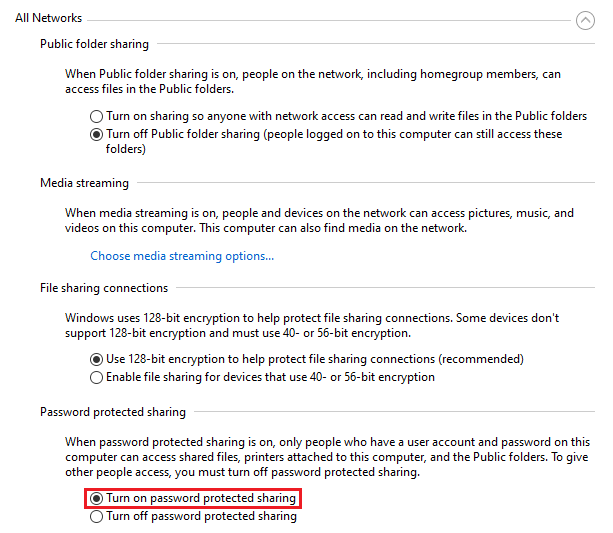
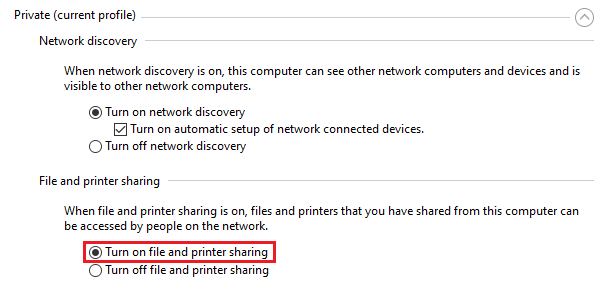
Once the Windows Firewall profile has been set to private, the advanced sharing options in Windows will also have to be adjusted accordingly. Make sure that file and printer sharing is turned on for the private Windows Firewall profile. As well as the option to enable password protected sharing for all networks. This is very important to securing access to the shared resources. Please follow the steps below to confirm the advanced sharing settings.
- Press the Windows logo key and the letter R simultaneously on the keyboard. This will open the Run command window.
- Type "control" in the input field and click OK.
- Select "Large icons" in the "View by" drop down towards the top right and open the "Network and Sharing Center."
- Click "Change advanced sharing settings" in the left column.
- Select the option under Private to "Turn on file and printer sharing."
- Select the option under "All networks" to "Turn on password protected sharing" and then save the changes.
Step 2: Create the "Share" user for authentication & hide it from the Login screen
For the examples in this guide, we'll create a local user account called "Share" that'll be used for authentication. You can name this user account whatever you'd like, but the name that you choose will need to be substituted in the steps that follow. This user will only need to be created on computers that are hosting shared resources. In other words, this is the computer where the files to be shared are stored or the computer that has the printer directly connected to it that'll be shared out. You'll create this user by opening a command prompt with administrative privileges and entering the following command. Substituting [PASSWORD] with a secure password for the Share user.
net user /add Share [PASSWORD]
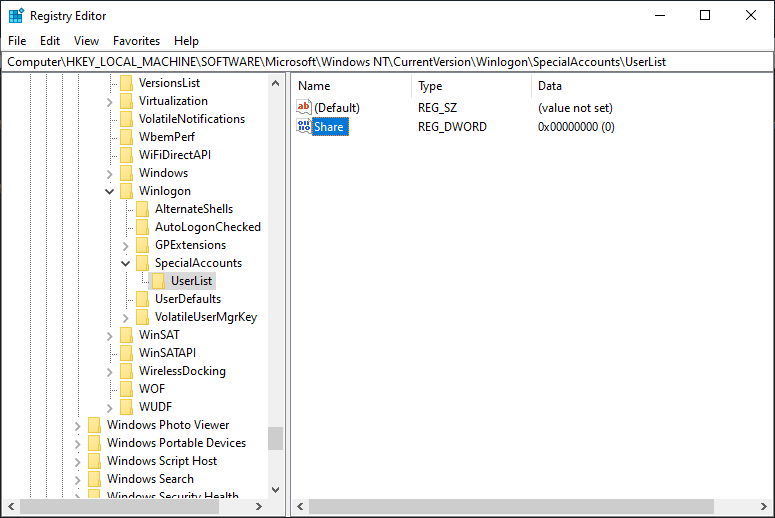
Now that this user is created, we'll want it to work entirely in the background as a seamless process to the actual user. This is done by using a registry setting that dates all the way back to Windows XP. Where this registry setting was used to expose the local Administrator account as an option on the Windows login screen. In this case, we'll be using this setting in reverse to hide the Share user account from view on the login screen. Open a command prompt with administrative privileges and enter the following command to hide the Share user. If you've chosen to use a different account name other than Share, please update this command. Replacing "Share" with the account name that you've chosen.
REG ADD "HKLM\Software\Microsoft\Windows NT\CurrentVersion\WinLogon\SpecialAccounts\UserList" /v Share /t REG_DWORD /d 0 /f
Step 3: Configure the resource to be shared with other computers
Please follow the steps below to configure the sharing options for either the printer or folder that you'd like to share.
Printer
- Press the Windows logo key and the letter R simultaneously on the keyboard. This will open the Run command window.
- Type "control" in the input field and click OK.
- Select "Large icons" in the "View by" drop down towards the top right and open "Devices and Printers."
- Right click the printer you wish to share select Properties from context menu.
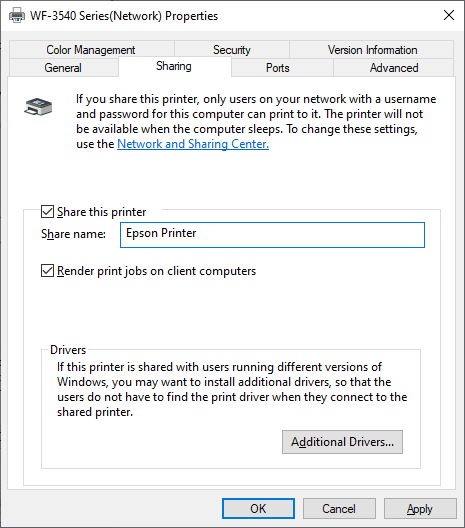
- One the Sharing tab, check the box to "Share this printer." The share name will auto populate, but this can be changed to whatever you'd like. It's recommended to keep it short.
- Click Apply and OK to save the settings and exit the Devices and Printers window.
Folder
- Right click the folder in Windows Explorer that you wish to share and select Properties from the context menu.
- On the Sharing tab, click the "Advanced Sharing" button.
- Check the box to "Share this folder" and then click the Permissions button.
- Click the button that says Add and enter the account name "Share" in the field to select the object.
- Grant the desired permissions for the Share user. Whether you want to them to only read the files and folders within or if you'd like them to also be able to create, modify, and remove files as well. Then click OK to save the settings.
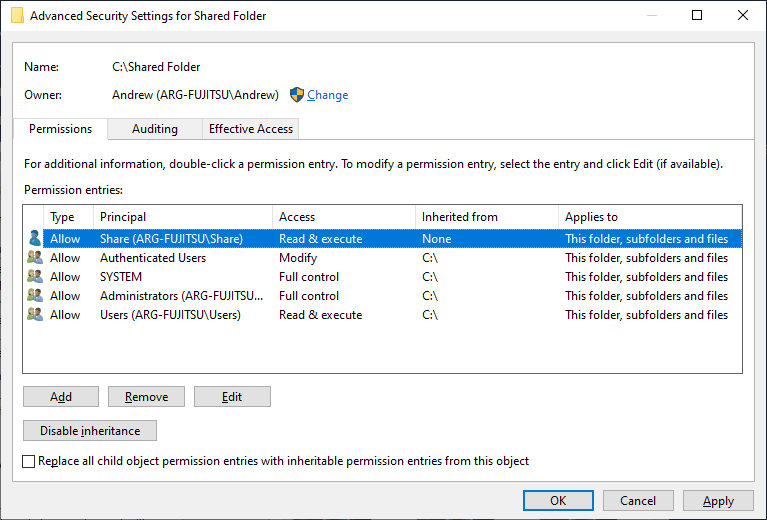
- On the Security tab, click the Edit button and then the Add button on the next page.
- Type "Share" in the field to select the object and adjust the desired permissions for read, write, etc. as you did before.
- Click Apply and OK to save the settings
Step 4: Add the Share user to the Credential Manger and connect the shared resource
Determine the hostname of the computer that's hosting the shared printer or folder. This is the hostname of the computer where the shared folder or printer was configured in the above steps. Open a command prompt on that computer and type the following command and press Enter. Take note of the hostname that is shown in the output.
hostname
Now that we have the hostname of computer hosting the shared resource, go to the computer that you'd like to connect this shared folder or printer to and perform the following steps to add the appropriate credentials into the Windows Credential Manager. This will ensure that these credentials are saved in Windows so that they won't need to be re-entered every time the computer is restarted.
- Press the Windows logo key and the letter R simultaneously on the keyboard. This will open the Run command window.
- Type "control" in the input field and click OK.
- Select "Large icons" in the "View by" drop down towards the top right and open the "Credential Manager."
- Select the option for "Windows Credentials" towards the top and click the link that says, "Add a Windows Credential"
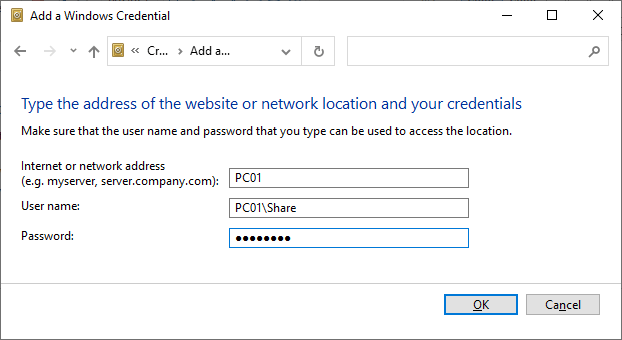
- Type the hostname that you've obtained above in the field labeled "Internet or network address."
- In the "User name" field, you'll type a combination of the hostname and the username of the "Share" user that was created in the following steps. So if "PC01" is the hostname that you've obtained earlier, you'll enter "PC01\Share" in this field. Where the hostname and the username is separated by a backslash (\) character.
- Enter the password that you had set on the Share user when you created it in step 2.
Now that the Share user credentials are saved in Windows on the client computer, we can now browse to the computer that's sharing the printer or folder to connect to it. This is best performed by using the Run command window. Which can be opened by pressing the Windows logo key and the letter R simultaneously on the keyboard. In the Run command window that appears, type the hostname of the computer hosting the shared folder or printer preceded by two backslashes. Using our PC01 example from above, "\\PC01" would be the correct entry to type into the Run command window.
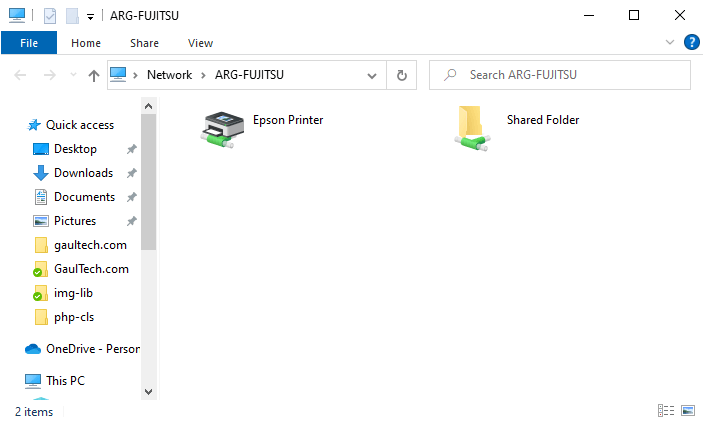
Once you've clicked OK, you should then be presented with a Windows Explorer window that shows the shared resources that you've configured in the previous steps. If it was a printer that you shared, simply double click the shared printer in this window to install it. Windows will automatically install the drivers for the shared printer from the host computer. If it was a folder that you had shared, you can double click it in the Windows Explorer window to open it. You can make accessing this folder easier in the future by dragging and dropping the shared folder to the desktop on the client computer. This will create a shortcut to the shared folder.
