Setup PPTP VPN server on Ubiquiti EdgeRouter
PPTP is the predecessor to the more secure L2TP over IPSec protocol that can also be used to provide a user with remote access to a network. Working from home and other remote locations is a very common practice in today's time. This guide will go over the steps to set up a PPTP VPN server on a Ubiquiti EdgeRouter as a simple method of allowing employees to perform a variety of office tasks from nearly any remote location. Using the built-in VPN client software that's already included in Windows and other operating systems.
- Users can connect with this VPN and then utilize a Remote Desktop client to connect with their office workstations.
- Network administrators can use this VPN to access servers on a local network or configure devices such as network printers and scanners.
Although PPTP is still an option in all modern Windows operating systems currently, other operating systems, such as Apple, have removed their native support for the PPTP VPN protocol due to the availability of alternative and more secure VPN options. If you're looking for a more secure VPN configuration that's also supported by a wider variety of operating systems, you may want to setup the L2TP over IPSec VPN server on the EdgeRouter instead. PPTP is an older standard that shouldn't be used in cases where a more secure VPN protocol option is available.
Step 1: Log into the router's command line interface
The EdgeRouter's web interface has a virtualized SSH utility that can be used to issue commands to the router. Access the router's web interface by entering the IP address of the EdgeRouter's LAN interface into a web browser from any computer that's connected to the local network. You'll see a link to the router's CLI at the top right corner of the web interface.

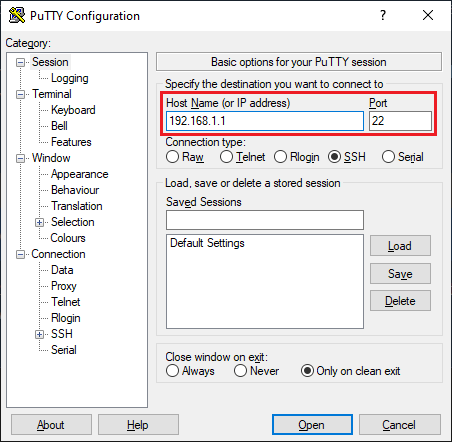
An alternative method of accessing the command line interface on the EdgeRouter is through a third party SSH utility. Such as PuTTy. Launch the SSH utility and enter the LAN interface IP address of the EdgeRouter to make a direct connection to the command line interface.
Step 2: Enter Configuration Mode in the command line
The EdgeRouter will not apply any configuration commands until the router is in Configuration Mode. This is accomplished by submitting the command configure to the router. You'll notice that the suffix in the prompt will change from the dollar sign character ($) to the hashtag character (#) once the router has successfully entered Configuration Mode.
ubnt@EdgeRouter:~$ configure

[edit]

ubnt@EdgeRouter#
Step 3: Enable local authentication & set a username and password
Enter the following commands into the EdgeRouter to enable local authentication mode. This is an alternative authentication method to a RADIUS server configuration that utilizes a third party authentication setup. Local authentication mode creates a database of usernames and passwords on the EdgeRouter for VPN authentication that functions independently.
The second command below will create the initial user in the configuration. This can be the first VPN user that you'd like to create in the VPN configuration. The setup requires that at least one user exists while configuring the PPTP VPN server. Replace [USERNAME] and [PASSWORD] in the command below with the respective username and password that you'd like to assign to this user.
set vpn pptp remote-access authentication mode local

set vpn pptp remote-access authentication local-users username [USERNAME] password [PASSWORD]
Step 4: Set the PPTP VPN IP address pool
This address pool will represent the range of IP addresses that'll be assigned to clients that connect with the PPTP VPN server. Each user that makes a connection with the VPN server will be assigned one of these IP addresses for the duration of their connection. It's recommended that this address pool be large enough to accommodate any number of VPN users that'll be connected at any given time. This pool will also need to consist of IP addresses that aren't currently assigned to other pools, such as the DHCP pool, or IP addresses that are statically assigned to other devices on the LAN to avoid any IP address conflicts.
The EdgeRouter will allow the use of IP addresses in this pool that are part of the local LAN. The command below assumes that the local LAN subnet on the EdgeRouter is 192.168.5.0/24. We'll be setting an IP address pool for the PPTP server that ranges from 192.168.5.180 to 192.168.5.189 in this example. Making a total of 10 IP addresses in this pool that'll be available to VPN clients.
set vpn pptp remote-access client-ip-pool start 192.168.5.180

set vpn pptp remote-access client-ip-pool stop 192.168.5.189
Step 5: Set the DNS servers that'll be assigned to VPN clients
The commands below will configure the DNS servers that'll be assigned to clients when they're connected to the PPTP VPN server. If you have a domain environment, it's recommended to set the domain controller's IP address in place of [DNS SERVER 1] in the first command below. This will allow VPN clients to resolve the hostnames of computers on the local LAN while connected to the VPN.
If a domain environment doesn't exist or if resolving hostnames isn't of concern, you may use Google's Public DNS servers in the commands below. Replace [DNS SERVER 1] and [DNS SERVER 2] in the following commands with the primary and secondary DNS servers of your choosing.
set vpn pptp remote-access dns-servers server-1 [DNS SERVER 1]

set vpn pptp remote-access dns-servers server-2 [DNS SERVER 2]
Step 6: Set the listening address or DHCP interface
The final step in the command line configuration will depend on whether or not you have a static or dynamic IP address with your ISP that's assigned to the WAN interface on the EdgeRouter. This will be the interface that accepts the inbound connections from the Internet to connect with the PPTP VPN server.
The following command will be used if you have a static IP address with your ISP. Replace [WAN IP ADDR] with the static IP address that's assigned to the EdgeRouter's WAN interface.
set vpn pptp remote-access outside-address [WAN IP ADDR]
If your ISP has assigned you a dynamic IP address or an IP address that the EdgeRouter obtains via DHCP, then the following command should be used instead. Replacing [WAN INTERFACE] with the WAN interface on your EdgeRouter. If you've used the setup wizard during the initial configuration, then this interface should be eth0.
set vpn pptp remote-access dhcp-interface [WAN INTERFACE]
Step 7: Commit and save the changes
With the command line configuration now complete and in place, these changes now need to be committed and saved to the EdgeRouter. This is done by submitting the two commands below. Additional output will be displayed after submitting the commit command that states the services relating to the VPN have been started. If any error messages are displayed, confirm that you've completed all of the prior steps and submit the command again. Otherwise you may continue with the save command if there weren't any errors displayed. This will then save the running configuration to the startup configuration on the EdgeRouter that'll be loaded automatically when the router is rebooted.
ubnt@EdgeRouter# commit

ubnt@EdgeRouter# save
Step 8: Add firewall rules required to accept VPN connections
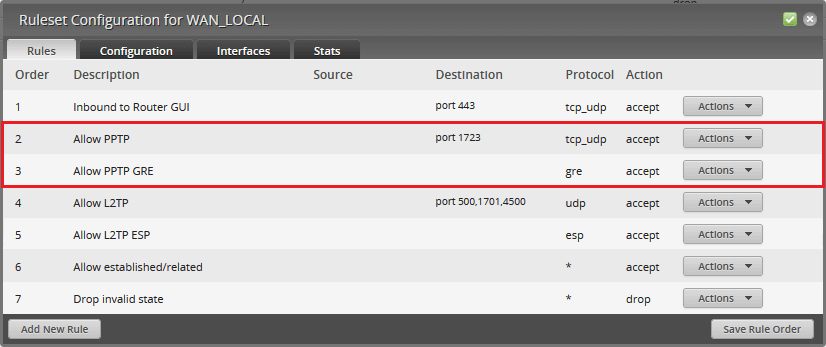
The EdgeRouter firewall will block incoming connections to the PPTP VPN server by default. Firewall rules will need to be created to permit access to the necessary ports and protocols required for these connections to take place. Assuming that you've used the setup wizard in the initial setup of the EdgeRouter, a firewall policy named WAN_LOCAL should exist. This policy will need to be modified to add the following additional rules. Perform the steps below to complete this process.
- Log into the web interface of the EdgeRouter.
- Click the Firewall/NAT and then Firewall Policies in the sub-tabs.
- Click Edit Ruleset under the Actions dropdown for the WAN_LOCAL policy.
- Select the Add New Rule button.
- On the Basic tab, enter
Allow PPTPin the Description field, select Accept as the action, and TCP as the Protocol. - On the Destination tab, enter
1723in the Port field. Leaving all of the other fields blank. - Save this rule and then select Add New Rule again to add another.
- On the Basic tab, enter
Allow PPTP GREin the Description field, select Accept as the action, and Choose a protocol by name. - Select GRE as the protocol in the drop down that appears and then save the rule.
- Drag and drop the two new rules so that they're above the two default rules Allow established related and Drop invalid state. Then select the button to Save Rule Order.
Step 9: Add additional users via the Config Tree
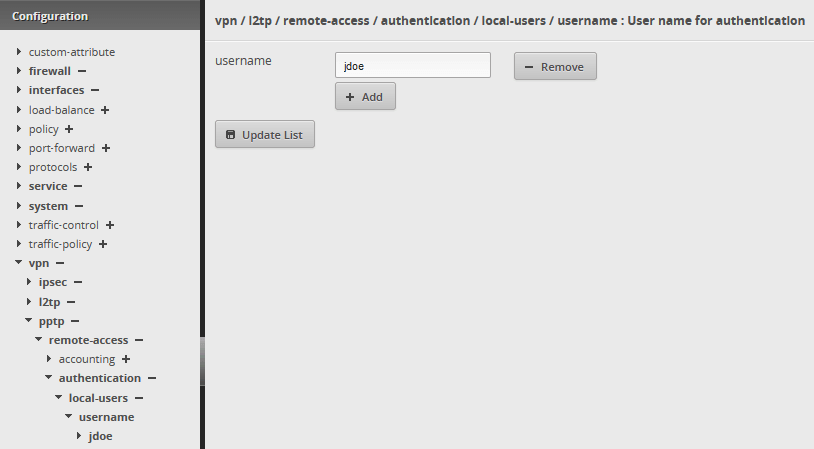
If there are additional users that require access to the PPTP VPN server, they can be added to the configuration via the Config Tree that's available in the web interface of the EdgeRouter. This will be an easier method than adding these users using the command line interface as was done in step 3 with the initial user. If the Config Tree tab is not present in the EdgeRouter, you may need to upgrade the firmware to a later version in order for this option to become available. Complete the steps below to add any additional users to the PPTP VPN server configuration via the Config Tree.
- Log into the EdgeRouter's web interface and open the Config Tree tab.
- Expand VPN -> PPTP -> Remote-Access -> Authentication -> Local-Users -> Username.
- Click the Add button to add as many users as you need and enter the appropriate usernames.
- Click the Update List button and then select the newly created users in the pane on the left.
- Set a secure and unique password to each user account that was created.
- Click the Preview button at the bottom and then Apply Now to save the configuration.
Step 10: Setting up VPN client on the computer
A connection with the PPTP VPN server is made using the built-in VPN clients included in most operating systems. Since Apple has removed support for the PPTP VPN protocol, the steps for only the Windows VPN client will be shown below. These steps are to be performed on the computer that a user will use to connect with the local LAN from a remote location. Follow the steps below to configure the Windows VPN client for this connection.
- Simultaneously press the Windows Logo key and the letter R on the keyboard.
- Type
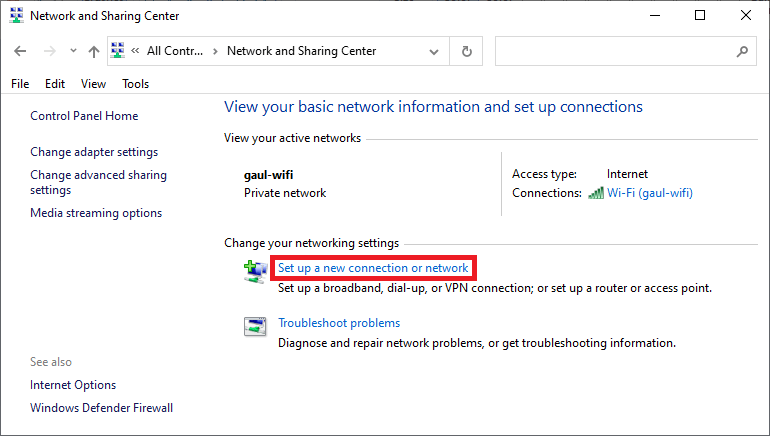
control.exe /name Microsoft.NetworkAndSharingCenterin the Run Command window and click the OK button. - Click the link to Set up a new connection or network.
- Select the option to Connect to a workplace.
- If you're prompted to use a connection that's already created, select No and click the Next button.
- Click on Use my Internet connection (VPN)
- Enter the EdgeRouter's WAN interface address in the Internet Address field. The Destination Name for this connection can be set to any friendly name of your choosing. This will help you to identify it later.
- Click the Create button to create the connection and then exit the Network and Sharing Center.
Step 11: Establishing a connection to the VPN
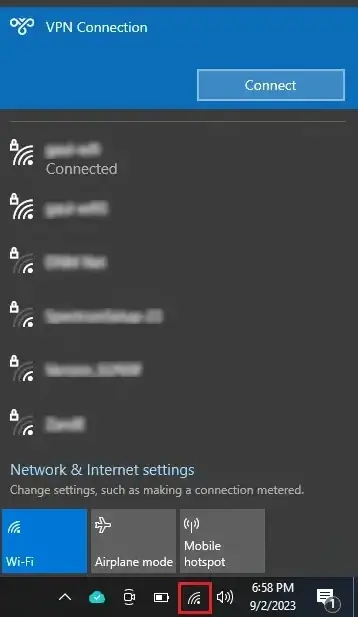
Connecting with the VPN is a simple process once the client is configured. Click on the network icon that's shown in the system tray near the bottom right corner of the display. This icon will appear differently depending on whether you're connected to the local network via Ethernet of Wifi. Windows 11 will also has a subsection for VPN that'll be available after clicking on this icon. This will open a tray where your VPN connection will be displayed as the friendly name that was assigned to it in step 10.
Click on this VPN connection and then click on the Connect button that appears upon selection. Enter the username and password that was configured previously for the applicable user when prompted to establish the VPN connection. The word "Connected" should appear under the friendly name of the VPN connection as it appears in the tray once the connection is successful. The user will then be connected to the LAN network of the EdgeRouter via the remote location and can proceed with accessing any applicable resources. Such as connecting to their office workstation via a Remote Desktop application.
